Friday, September 30, 2011

More On Meditation


I know I already wrote a post on meditating but I feel the need to follow up with a few other points. Let me start with the idea that the form of meditation that is right for you, is the one that works for you.

You see, for yoga teacher training, some of the required reading is Jivamukti Yoga by Sharon Gannon and David Life - the mama and papa of Jivamukti yoga! I'm in the midst of a chapter on meditation and I just really want to share some thoughts that are expressed in the book.

Sharon and David compare meditation to falling asleep. You can't make yourself fall asleep - what you can do is perform all of those nightly rituals (getting cleaned up, putting on pajamas, lying in bed) to help facilitate falling asleep and then it just happens...maybe. In the same way, you cannot make yourself meditate - you can take steps to facilitate meditation (sitting comfortably, closing your eyes, concentrating on your breath) and then meditation just happens...maybe.

The cool thing is, when you can't fall asleep, you don't consider it a failure. The next night you repeat all your nightly rituals and try it again. This is how meditation should be approached. You haven't "failed" if you don't achieve uninterrupted concentration and connection to the "True Self". You just have to keep practicing!

So let's talk about the ways you can facilitate a meditative state, those "nightly rituals" you can perform to ultimately help you fall asleep. First...sitting. {I'm feeling lazy...click on the pictures for sources}

Choose a seated position that is comfortable for you in which the spine is perpendicular to the earth:


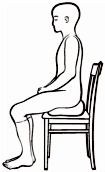
1. Sit in a chair. One that is not too soft and has a straight back. Find a chair that you can set your feet flat on the floor, or put a box underneath your feet. Your legs should be parallel to each other and your hand can rest in your lap or on top of your thighs.

2. Sit cross legged. Place a folded blanket or cushion underneath your butt so that your hips are higher than, or even with, your knees. You can even place the knees on top of blankets or cushions so they get some support - let them feel like they can just drop into the blankets. If you want to, lean against a wall for support.

3. Supported Virasana (hero's pose). Kneel on both knees so that the tops of the feet rest on the floor and the inside edges of the feet rest against the thighs. Place a folded blanket or cushion underneath your butt, so that you are lifted as high as necessary for your knees to feel comfortable.

4. Vajrasana (thunderbolt pose). Kneel back and sit on the inside of your feet with your heels on the outside of your butt. Let the big toes touch, putting the right big toe on top of the left. 

5. Half lotus. Sit cross legged and place the right foot on top of the left thigh with the soles of your feet turned upward. Sit on a blanket or cushion to let your knees drop closer to the floor.

6. Siddhasana. Sit so your left heel presses against your pelvis (or close to it), tucking your toes between your calf and the right thigh. Place the right heel on top of the left heel and tuck the right toes between the calf and thigh of the left leg.

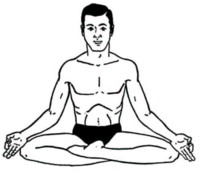
7. Lotus Pose. Place your right foot on top of the left thigh, as close to your pelvis as possible then place the left foot and place it on top of the right thigh as close to the pelvis as possible.


Now...hand positions.

1. Hands resting on the thighs, palms up or down. Relax your fingers and allow them to fall slightly apart from each other. Shoulders should be open and relaxed.

2. Chin mudra. Join the tip of the thumb with the tip of the index finger. Let the other three fingers separate. Palms up or down.

3. Bhairavi mudra. Place hands in our lap, palms facing up. 


So, now you can go forth and make your self comfortable and allow your meditative state to set in! 

On a related note, this weekend is my first YTT session and I am so NERVCITED! I think I'm going to meditate on it a bit...

Thursday, September 29, 2011

How to Build a Standing Desk

A few weeks ago, I enlightened you all to my standing desk:

Looking down at my monitor was getting old fast...and you can only stack your computer on so many books before it becomes unsafe. 

Luckily, we just got a new test machine at my office, which came in a big wooden box made of 2x4's and OSB (oriented strand board - I didn't know what it was either). 

Liiiiiight bulb!


Naturally, I took some measurements and built a m.a.s.t.e.r.p.i.e.c.e. of a standing desk:

See, there are perks to being an engineer! It was actually pretty easy once I had all the materials.

materials...
  • a sheet of OSB
  • about 108 inches of 2x4
  • 16 screws
  • a drill
  • a rotary saw
  • a tape measure
  • a pencil
  • safety goggles (!!)
method...

  1. cut the OSB into one 30"x16" rectangle and one 24"x16" rectangle (these are your table tops) with the rotary saw. don't forget to wear safety goggles when cutting!!!
  2. cut the 2x4's into four 17" segments and four 10" segments (these are your legs)
  3. at the four corners of each table top piece, drill pilot holes through the OSB and into the legs. you might want to do this one at a time to make sure they match up
  4. attach the legs to the tops using screws. 
  5. place mini-tables on top of your desk and decorate with you computer, monitor, keyboard, etc.
Keep in mind that those height measurements are for someone my size (a towering 5'0" tall) so if you want to do this, you should definitely measure something that will work for your height. Also, the length and depth measurements might need to be tailored to your desk.

It definitely helped that I had all the tools and materials at my disposal. Also, my lovely colleague, Aaron, who did all the cutting while I stood by and supervised!

I've been standing at my new and improved standing desk for several days now and it's much easier on my neck not having to look down all day. Since I've been standing for a while now, it's been much easier on my lower back too! I had a few really good suggestions on my last standing desk post about what to do about pain or discomfort while getting used to standing all day:
  • for lower back pain, rest on foot on top of something (a box, footrest, etc.) to help curve your tailbone forward and allow the lumbar spine to curve forward
  • alternate sitting and standing (I can do this pretty easily because I can just un-dock my laptop and put it on the real desk)
In general, if you're switching to a standing desk, just take it slowly. Listen to what your body is telling you. Be kind, rewind :)


Tuesday, September 27, 2011

Race Recap: Akron Marathon Relay


I'm gonna just say it. I suck at taking pictures. This post should have way more pictures than it does, considering I ran one of the shortest relay legs.

Oh well, I began the weekend severely unprepared anyway.

Let's begin at Friday. I spent the evening in Akron at Emily's (my old roomie) place. When I got to work on Friday morning - mind you, it's a 50 minute drive - I realized I forgot to bring my watch, my socks and my running shoes. Whoops.

Thank goodness my Vibrams were in my car.

I had a master plan for the morning: drive downtown to meet my team for the start, drive back to Emily's  and run the 1 mile from her apartment to my relay exchange point, run my leg of the relay, run the trail along Sand Run Parkway back to her apartment. Total mileage: about 7.5 miles.

Way more than I've ever done in my Vibrams.

I couldn't sleep at all on Friday night. I don't know why. I wasn't really nervous, I wasn't going to run too far, I'd started and finished this race before. But I was up every hour. On the hour. (Just like the news!) I finally got up around 5:20 - ten whole minutes before my alarm went off and began my morning rituals.

I managed to make it to the start without too much difficulty, considering the road closures, and met Kali, Ann (our official coach/cheerleader/relay organizer), Paul, Ryan and Julie to gather our race bibs. Julie #2 was also there to hang out with us at the start! She decided to run the last leg of the relay for her team 11 hours prior to the race, and I have to hand it to her because running 8 miles at the drop of a hat is nothing to sneeze at.
{photocred: miss julie}

I also got to catch up with a good friend of mine who moved to Milwaukee a few years ago but always comes back to work the marathon with his family. It was so awesome to see him for a happy, albeit brief, reunion.

I drove back to Emily's, watched a recorded episode of Community, then put my shoes on and ran up to my exchange point. I got there before it got super busy, but I started getting worried when they began announcing numbers, one after the other, as fast as they could. What if I missed them calling our number? Seriously, it was like"

"7645......8001.....7556....8012...8075..7915.8145 8556 8475 8225 8222 7895 8129 6954 8035 8054"

Ahh! That's my number, time to go!!

Julie was right before me and looking pretty strong after the hill she just had to run, I gave her a "you go girl!" and headed down Sand Run Parkway. I know the road pretty well because I used to live a mile away and traversed it a lot when I was training for Akron in 2009. I have a love/hate relationship with Sand Run Parkway. I'll tell ya what though, it's much nicer tackling those hills on fresh legs than it is after having already run 15.5 miles! Just sayin'.

All I know is that I was feeling pretty good and before you knew it, I was looking for Kali at the next exchange point. I didn't have a watch on so I couldn't even tell you how fast (or slow - it's all relative) I was going.

Unfortunately I didn't make it back to the finish because after running back to Emily's there was no way for me to get there in time to see Kali finish...the road closures make things a bit sloppy. I didn't miss all the tweets though:

3:58!!!! That's really exciting to someone who has never run a sub-4:30 marathon. The official time:
So it looks like I was running about a 9:18/mile. I was feeling awesome the whole time and I managed to get in almost 8 miles in my Vibrams! I'll take that.

And I'll take pancakes at Fisher's and a two and a half hour nap before the tribe game. 

It was a good day :)


Friday, September 23, 2011

New Song Friday!

A few weeks ago, we got a card in the mail.

(I know right?! Snail mail?!?)


It was a "happy engagement" card from Brandon's high school friends. I'll tell ya what, it was the most wonderful and thoughtful thing!! Along with the card they sent us the modern version of a mix tape...a mix CD!

a.w.e.s.o.m.e.


!!!


I have to share one of the songs that I am in love with on the CD:

Better Than
John Butler Trio

"life's not about what's better..."

Happy Friday!

Thursday, September 22, 2011

Daily Meditation

{photocred: http://media.smithsonianmag.com}

I may have already lost some of you on the title of this post, but I really want to talk about meditating today.

In the past few years yoga has become a bigger and bigger part of my life. First, for the physical aspect of it (hatha yoga) and later for the spiritual and intellectual aspects (jnana yoga, bhakti yoga, karma yoga, etc.).

Something that has always managed to escape me was meditation.

Starting last Monday, Brandon and I have embarked on a journey of daily meditation. This is partly because an ongoing yoga teacher training assignment is to meditate everyday, but also because we want to consciously open every day with intention. For me, meditation is much tougher than the physical practice of yoga.

Quieting my mind can be as difficult as asking me not to eat for a week. Not impossible...just difficult. So, I have to practice, same as anything else.

Enter daily meditation, stage right. Here's how I practice:

  1. Alarm goes off at 6:30 am (this is no different than before practicing meditation - the only change is me not hitting the snooze button three times)
  2. I get up and put on my robe (lovingly known as the spotted tiger).
  3. I light a candle and place it in front of me, wherever I choose to sit. I either sit up on my bed or on the floor, but either way my spine is perpendicular to the floor.
  4. Place my focus on something specific...my breath, the candle, a certain mantra
  5. Let. Go. for however long I feel like it (thus far I have no been late to work)
If you are like me and have a tough time meditating, try a few of these:
  • when you meditate, try not to adjust your position, even if you are uncomfortable. Try and just let the feeling pass
  • focus on the breath, but don't control it. Just notice how it feels when it passes through your nose and into your lungs then back out again
  • your bed is a good place to meditate if the rest of your home is not free of distractions or if you share your home with others
  • set an alarm and try for a short amount of time at first (3-5 minutes)
  • do it in the same place and at the same time everyday
  • keep a meditation journal to track date, duration and anything that comes up during the meditation. This will help you observe patterns, habits and break throughs in your practice.
My favorite part of daily meditation is beginning the day with an honest and open intention. I don't haphazardly get out of bed, rub the sleep out of my eyes and try to be awake enough to get to work...I begin my day with a clear mind and a positive outlook. 

love.

Tuesday, September 20, 2011

Ch-ch-ch-changes.


I have had a really exciting weekend!

Change is in the air. Can you feel it? It feels like autumn. It smells like autumn...we are about to embark on the journey that is surviving the winter here in northeast Ohio.

I am also embarking on another kind of journey, the journey of yoga teacher training!

Those of you who live in the Cleveland area, you probably know the yogini goddess Marni Task. She teaches at a few of the yoga studios on the east side of Cleveland and is the one responsible for yoga crack (a.k.a. Indu lotion...thanks Maria :)) I will be training with Marni and 21 other yogis/yoginis and I couldn't be more excited (and grateful)  for this new experience in my life!

I'm actually a little bit late to the game (surprise.) I found out Marni was teaching YTT the week after it started. I almost cried when I saw the dates. But I took a chance, sent her an email and after a conversation over the phone she agreed to let me jump in late. I'll be going to a few workshops in October to catch up on missed time.

It's autumn in Cleveland, time to welcome a lot of change!


Friday, September 16, 2011

Easy Peasy Vegetarian

There have been a few times in the last year or so that my mom has bought up some of her concerns about becoming a vegetarian. She has tried it a couple of times only to go back to her roasted chicken dinners claiming that "being a vegetarian is just too hard."

I have two responses to that.

First, not eating meat is not for everyone. You have to do what feels right for you. I didn't even mean to stop eating meat purposely - it's just what fit into my life at the time. It changes from day to day for me, but is mostly based on karma, intention and knowing my food source (you can read all about it here). That being said, you should become a vegetarian for reasons that make it right for you...regardless of what the reason is. There is no sense trying to force it either. If it's not something that is fun or enjoyable, then why do it?

My second thought is on cooking vegetarian. It's not as hard as you think. For starters, there are literally a ton of resources online for easy meat-free cooking.

But for those of you who don't want to spend the time looking those recipes up, I took the liberty of selecting a few of my personal favorites. These recipes are less intimidating for the veggie newb, but they are different enough that you won't get bored or run out of meal ideas.

Breakfasts
Poached Eggs - this is comfort food in my book
Breakfast Wraps - Brandon can make these in 5 minutes flat

Breakfast Frittata - you can use any veggies that you have on hand in this one

Lunch
Babaganoush Soup - it's basically roast, boil, puree, eat.
Kale+Goat Cheese Pesto Pasta - goat cheese. Enough said.

Dinners
Vegetable Stew - ignore the bread bowl to keep it easy

Snacks/Desserts
Mesquite Chocolate Chip Cookies - bonus! these are vegan

What are your favorite easy veggie recipes?

Thursday, September 15, 2011

My Standing Desk Experiment

Once upon a time, I wrote a post about how alarmed I was to hear just how bad it is for you to sit all day. Then, those sentiments were compounded with an email from my colleague with this link in it. Finally, the breaking point for me was when I read Erin's post about how she stopped sitting all day.

So, I finally stopped complaining and did something about it - I created a makeshift standing desk:

I'm a whopping 5'0" tall, so I don't need many inches to be able to stand comfortably at my desk. All I did was stack a bunch of textbooks up under my laptop and face the other monitor up towards me. Eventually, I plan on making a trip to Home Depot and making a stand (I even measured and know exactly what I need) but for now, stacked books works swimmingly. 

Some things I like about a standing desk:
  • I'm using muscles I wouldn't be using if I was sitting all day
  • It makes me want to walk to the printer that is farther away from my desk (well, that and it's just a better printer in general) because I'm don't feel as lazy
  • I'm more energized in the afternoons
  • It's way more convenient for me to stretch when I'm already standing
  • I can dance at my desk (!!)
Some things I don't like about a standing desk:
  • I find that my lower back gets a bit tense/sore by the end of the day
  • I go to the bathroom way more often, so I can have a break from standing (haha okay, okay - that's actually not a bad thing...it just means more time with Angry Birds!)
  • With my current setup, I think my neck gets overworked from looking down at my monitor
So, my overall thoughts on the standing desk sitch? 

Everything in moderation - it's probably just as bad for someone to stand all day as it is to sit all day. Doing anything in the extreme isn't always the answer. 

I love that I'm being intentional and proactive with my health.

I hope that I am raising health awareness in my office - because I can bet that at least two out of the eleven people in my immediate vicinity will end up with diabetes or heart disease of some kind.

What are your thoughts on the standing desk??


Tuesday, September 13, 2011

Making the Dress, part 1

One of the first thoughts I had when Brandon asked me to marry him, was "I want to make my dress." 

I swear I'm not delusional...I made my prom dress in high school. Also, I don't even have a wedding date yet, but I'm starting now, so if I F-up then I still have time to buy a dress. 

My first task was to pick a pattern. After much deliberation and sending pictures to just about everyone that I knew, I settled on this one:
{photocred: http://www.sewdirect.com}

Except, I really want capped sleeves, so I'm going to play with the pattern so they will look more like this:
(sorry, this is the best I could do with Paint)

That, and I'm going to add a sheer outer layer on the skirt, if you can imagine what that looks like. 

Step two, buy material. I settled on a nice flowy silk, with chiffon as the aforementioned outer layer. I'm also going to make my sleeves out of the chiffon. 


So then after I made sure to wash and pre-shrink any material (not as if this matters for me, we don't have a working dryer - although I did steam it) I laid it all out in my living room...er, I should say all over my living room:


Now is the fun part... 

...and by fun, I mean tedious. Pinning the pattern to the material. 


Ingrid (my step-momma) always told me, pin twice, cut once. 

The skirt is going to be the toughest part. It's got a lot of real estate. 

And so it goes, I have officially begun the making of my wedding dress. As of today, I've got about a third of the lining cut. My plan is to put a couple of hours in at a time, one or two days a week...that way I won't get overwhelmed and/or bored trying to do it all at once. 

Wish me luck!!

Friday, September 9, 2011

Tips for New Runners


If you're new to running, this blog might be a bit overwhelming to you. The truth is, yes, I do run marathons. I do love to challenge myself with long endurance events. I do like to write about all my long and exciting feats of humanhood.

When it really comes down to it, I love my typical, everyday slow and short run. You just don't hear about them very often, because they are just that: typical. I don't often write about all of those shorter less intimidating  runs. The techniques and training plans that I follow are pretty tried and true and they'll work for runners of all flavors; from the marathoner to the "half a mile is enough for me" runner.

So, here are some tips if you're just getting into running and needs a bit of direction, if you are coming back from an injury, or just need some back-to-basics inspiration...

{photocred: http://sme-blog.com}
  1. Start with the basics. I mean this literally, just put one foot in front of the other. Ok, try going a bit faster. Now slower. Jump over the cracks in the sidewalk. Run like you did when you were a kid, just because.
  2. Run on a route you are familiar with. From your front door, make 4 right turns until you get back to your front door. Run around your neighborhood so you know the landscape (no hills that can sneak up on you!) and your neighbors (just in case something happens). Since most neighborhoods are not terribly large, this will help your first few runs seem less intimidating...unless you have a big neighborhood...then that idea is hosed. 
  3. Run with a buddy. Whether it's your husband, best friend or your dog, running buddies are the way to go, in my experience. Talking to someone will help keep your mind off the mileage and help push you a bit more. Trust me, it's tried and true. If you don't want to run with a person, because you want to try it out on your own first, a dog makes for a great running buddy with the added bonus of keeping you safe. 
  4. Wear stuff that you already own. Don't worry about going out to buy new shoes or running clothes for your first couple of runs. Old sneaks, a pair of athletic shorts and a t-shirt will do just fine. That dry-fit or moisture-wicking material doesn't really matter until you get up into longer mileage anyway. Don't worry about not "looking like a runner" either. At some point or another, we all look ridiculous when we are running and you are not running to look like a runner, right?
  5. Don't be afraid to run/walk, or just plain walk. If you get too tired to continue running, just walk. You'll make it through no matter how fast you are moving...that doesn't mean you failed. To be cliche, it's about the journey, not the destination. You can also alternate walking and running, which has a number of other benefits besides making things a bit easier. I know people who train for marathons like that.
  6. Your biggest hurdle is going to be your mind. All you need to do is get out the front door. The first step is always the hardest, but luckily, you get that out of the way first. 
  7. Listen to your body. I've said it again and again in various posts, but this is the single most important part of running, and it's something that many runners ignore. Don't try to run through an injury - you'll eventually have to take an extensive leave of absence from running if you do. Injuries (specifically musculoskeletal injuries) don't give you much warning before they sideline you. Your body is the best barometer of what you are capable of, so heeds its warning signs. Be nice to yourself and your body will reward you. 
{protocred: http://dingo.care2.com}

You are doing something awesome by simply putting one foot in front of the other. The possibilities are endless once you just start.

Happy running!


Wednesday, September 7, 2011

Quarter Century Firsts

Last week was an age 25 first for me: preserving!!

Brandon and I have been talking about canning/preserving for months now and I finally utilized my 20% off coupons from Bed, Bath & Beyond and bought a canning "rack". We had already purchased a huge stockpot for our homebrewing adventures.

So between the ginormous stockpot, a newly purchased canning rack and all of the deliciously home-grown tomatoes from our garden, it was the perfect chance to make a big batch of sauce and preserve it so we can enjoy it during the depths of winter.

If you are like me, and live in a place where the sun shines for 70 days out of the whole year and the winter lasts for 9 months, you are going to want to get on the preservation wagon so you can save all the freshness of summer to help get you through another winter.

do. it.

what you'll need...
  • big stockpot/saucepan, keep in mind you'll need something to completely cover the jars
  • jars (I like the pint jars, but quart jars work well too) and lids (the kind with a cap and band)
  • canning rack. Actually, you can use a cooling rack if it will fit into your pot - ours is square and the pot is circular, so that didn't work. 
  • something to preserve, the kind of canning I'm talking about is for high-acid foods like sauces and salsas. You need a pressure canner if you want to do vegetables, meats and seafood.

First, find a recipe or make one up yourself - salsa, marinara sauce, etc.... If you use a canning recipe (check out this site) you get the bonus of them telling you exactly how long to process your jars for. I made my sauce a day in advance in the slow cooker, quick and easy.

Second, once your sauce (I say sauce because that's what I did) is ready to go, fill the stockpot with water and bring it to a simmer. Clean your jars and lids thoroughly.

Third, fill the jars with your sauce. If the food is hot when it goes into the jars, it is recommended that you warm the jars and lids first - either by boiling them or using the dishwasher to heat them up. Make sure you leave some head space for expansion (quarter inch for soft spreads such as jams and jellies and fruit juices; 1/2 inch for fruits, pickles, salsa, sauces, and tomatoes). Once the food is in there, remove any air bubbles by sliding a rubber spatula down and around the sides of the jars. 

Fourth, clean the rim of the jar so there is no food left on it when you put on the lid. Put the lids on the jars and close til they are "finger tight".

Fifth, place jars in the canning rack and put them into the stockpot of simmering water. Make sure you have an inch or two above the top of the jars.

Sixth, process the jars for their allotted amount of time. If you didn't use a recipe specific for preserving, estimate your time by using a processing time that is use for a similar type of food (again, you can find those recipes here). Tomato sauces are in the 35-40 minute range.

Seventh, after processing, remove from heat and allow jars to sit in water for another 5 minutes.

Eighth, carefully (use a hot mitt!!) remove jars from the canning rack and set somewhere where they can cool and sit for 12-24 hours, undisturbed.

Ninth, check the lids for a seal. The lids should not flex up and down if they are sealed correctly. You can also check them by removing the band and trying to lift the lid off with your fingertips - it shouldn't move. If they didn't seal properly, you can reprocess them immediately or just use whatever you are trying to preserve!

Oh, and speaking of preserving our harvest from our garden. Look at what we harvested on Saturday:

Yup, that's a tiny ear of corn!!! It was about 1/18th the size of the Ohio Sweet Corn you find at the farmer's market, but it was just as delicious!


Related Posts Plugin for WordPress, Blogger...