Monday, February 14, 2011

Daring Cooks: Soba Noodles and Tempura Veggies


This was my first ever Daring Cooks challenge. It's something I decided to participate in as yet another way to increase my prowess in the kitchen and WOW did I challenge myself this month!

This month's challenge was hosted by Lisa from Blueberry Girl, and she chose to challenge everyone to a Japanese treat: Cold Soba Noodle Salad and...

TEMPURA FRIED VEGGIES?!?!

I don't eat very much fried food and when I do, it's almost certainly at a restaurant because I'm terrified of deep frying anything. I chose to do veggies because I don't really like shrimp and don't really trust the fish in Ohio since we're nowhere near an ocean.

The other side of this challenge was the cold soba noodle salad. Here's where I absolutely shined. I just discovered Heidi Swanson's Otsu recipe while we were on Maui and it absolutely swept me off my feet! A few months ago I stocked up on soba noodles from an asian foods market and I haven't had the chance to use them, so here was my chance!! For the record, at the asian food market in Ohio, 48 ounces of soba noodles were $3.99; on Maui at Whole Foods, 8 ounces of soba noodles were $4. Holy high cost of living...and Whole Foods prices. This dish is spicy, so leave out the cayenne if you don't want the heat. It's veggies and pan-fried tofu mixed with the noodles and a delicious spicy ginger sauce. My mouth is watering just thinking about it. This is a recipe that is DEFINITELY worth giving the time of day.

Anyway, back to the tempura...I was so happy to learn how to do this! My batter wasn't too thick so they didn't come out as breaded as your traditional tempura veggies, but I liked them that way. Again, I generally steer clear of deep fried anything (except poop...that story later) but it's a good kitchen skill to have and if I do eat fried stuff, tempura is always the way to go.

I loved the crispiness of the batter, which you get from keeping it on ice. My sweet potatoes needed to be blanched first, because they were still very starchy and uncooked. So either make sure you blanch your potatoes or slice them very very very thin so they cook through. The mushroom and asparagus were to die for. For dipping, I simply mixed some Bragg's Aminos with Sriracha sauce but they would be even better with a sweet and sour sauce (I'm posting a recipe anyway even though we didn't make it).


Tempura Veggies (this recipe came directly from the Daring Cooks forums)
Ingredients
1 egg yolk from a large egg
1 cup (240 ml) iced water
½ cup (120 ml) (70 gm) (2½ oz) plain (all purpose) flour, plus extra for dredging
½ cup (120 ml) (70 gm) (2½ oz) cornflour (also called cornstarch)
½ teaspoon (2½ ml) (2½ gm) (0.09 oz) baking powder
oil, for deep frying preferably vegetable
ice water bath, for the tempura batter (a larger bowl than what will be used for the tempura should be used. Fill the large bowl with ice and some water, set aside)
Very cold vegetables:
  • Sweet potato, peeled, thinly sliced, blanched
  • Assorted fresh mushrooms
  • Asparagus
Directions:
  1. Place the iced water into a mixing bowl. Lightly beat the egg yolk and gradually pour into the iced water, stirring (preferably with chopsticks) and blending well. Add flours and baking powder all at once, stroke a few times with chopsticks until the ingredients are loosely combined. The batter should be runny and lumpy. Place the bowl of batter in an ice water bath to keep it cold while you are frying the tempura. The batter as well as the vegetables and seafood have to be very cold. The temperature shock between the hot oil and the cold veggies help create a crispy tempura.
  2. Heat the oil in a large pan or a wok. For vegetables, the oil should be 320°F/160°C; for seafood it should be 340°F/170°C. It is more difficult to maintain a steady temperature and produce consistent tempura if you don’t have a thermometer, but it can be done. You can test the oil by dropping a piece of batter into the hot oil. If it sinks a little bit and then immediately rises to the top, the oil is ready.
  3. Start with the vegetables, such as sweet potatoes, that won’t leave a strong odor in the oil. Dip them in a shallow bowl of flour to lightly coat them and then dip them into the batter. Slide them into the hot oil, deep frying only a couple of pieces at a time so that the temperature of the oil does not drop.
  4. Place finished tempura pieces on a wire rack so that excess oil can drip off. Continue frying the other items, frequently scooping out any bits of batter to keep the oil clean and prevent the oil (and the remaining tempura) from getting a burned flavor.
  5. Serve immediately for the best flavor, but they can also be eaten cold.

Homemade Sweet and Sour Sauce
from foodnetwork.com

Ingredients:

  • 1/2 cup water (125 ml)
  • 1/4 cup rice vinegar (60 ml)
  • 1/4 cup sugar (60 ml)
  • 3 tablespoons ketchup (45 ml)
  • 1 tablespoon dry sherry (15 ml) (sub mirin)
  • 1 tablespoon soy sauce (15 ml)
  • 1/2 teaspoon chili oil (2 ml) (sub sriracha chili sauce)
  • 1-1/2 tbsp. cornstarch mixed with 3 tablespoons water (22 ml)
Directions:
  1. Combine all sauce ingredients except cornstarch solution in a medium-size saucepan. Bring sauce to a boil over medium-high heat, stirring constantly. Add cornstarch solution and cook, stirring, until sauce boils and thickens. Set aside.

Are there any cooking techniques that you want to try out? Have you ever made tempura anything? What was your experience with it??

Peace, Love & Bagels,

Friday, February 11, 2011

My 20 Minutes A Day Challenge


While perusing my Google reader, I came across a great idea:


Pick something you want to accomplish and announce it publicly. Then spend 20 minutes per day working on it.

Michael, from Sustainably Creative was the genius mind behind that one. You can find his original post here.

Some ideas for accomplishing your challenge task that he suggests are:

  • get a dedicated timer
  • stop at the end of your 20 minutes
  • reward yourself at the end of your time
  • if you can't do it 7 days a week, at least do 3 or 4
So right here in this post, I'm going to announce to the world what my 20 Minutes A Day Challenge task will be.

I knitted Brandon a scarf for Christmas. Well, I knitted him 3/8 of a scarf. My task is going to be to finish knitting his scarf so he can finally use his Christmas present.

But here are some other 20 Minute Challenge ideas:
  • read (this is definitely going to be my next one, as it is also part of my 2011 goals)
  • paint a picture
  • exercise
  • write
  • clean or declutter (ahem, another goal)
  • learn something new
  • work on your car (if that's your thing - I just know someone who is building a motorcycle from scratch)
What will your 20-minutes a day challenge be?

Peace, Love & Bagels,

Pasta with Kale and Goat Cheese Pesto


This is the second time I've made this pasta dish a la Heidi Swanson's 101 Cookbooks. The woman never dissapoints!! I have probably said this before, but I own her cookbook and I've already pre-ordered her next one. 


I made a few changes this time around; namely with the addition of avocado to the kale and goat cheese pesto. Good choice! It added to the texture a bit, adding some nice avocado-y creaminess. I was lukewarm about the flavor at first, but I just ended up adding a bit more goat cheese and that was the ticket! A nice balance of the buttery avo and the tart goat cheese.


Watch out for the hot peppers though! I brought the leftovers to work for lunch and had generously peppered my tupperware-full of pasta with home ground hot pepper flakes. When I reheated it, I just flipped the entire thing into a bowl, without stirring. When I got to the bottom of the bowl, I started sweating from the heat...not realizing I was getting more hot peppers than pasta. So, just a word of warning.


Pasta with Kale, Avocado and Goat Cheese Pesto Serves 4-6
Recipe adapted from (my favorite) 101 Cookbooks
My version of Heidi's delicious dish involves gluten-free pasta and the addition of avocados to the sauce. You can definitely substitute any type of pasta and you'll probably do well with just about any leafy green vegetable instead of kale. I've made this both with avocado and without, the avocado adds a nice creaminess to the sauce and a little depth of flavor. It also balances out the tartness of the goat cheese.


4 cloves of garlic, peeled
1/2 large onion, peeled and quartered
1 small bunch of kale, stalks removed, washed well
1/3 cup extra virgin olive oil
1/2 fresh avocado
1/3 cup goat cheese, plus more for topping
2 tablespoons + hot pasta water
fine grain sea salt & freshly ground black pepper
fresh lemon juice (optional)

1 package brown rice pasta

hot pepper flakes (optional)
grated parmesan cheese (optional)

Bring a large pot of water to a boil. Salt the boiling water generously, and add the garlic and onion. Boil for 2-3 minutes, stir in the kale and cook for another ten seconds. Don't overcook. Working quickly, use a slotted spoon or strainer to fish the greens, garlic, and onions from the water. Use a food processor to puree the ingredients along with the avocado, olive oil and goat cheese. Add a couple tablespoons of hot pasta water if needed to thin things out if needed. Then season with a touch of salt and plenty of black pepper to taste. If you need a little more flavor in the sauce, add fresh lemon juice a bit at a time until you're happy with it. Set aside.

Reheat the pot of water and boil the pasta per package instructions. Drain and toss immediately with the green sauce. Serve topped with a few pinches red pepper flakes, parmesan cheese and more crumbled goat cheese.


Do you have a favorite recipe from another food blogger or a specific chef?


Peace, Love & Bagels,

Thursday, February 10, 2011

I design orthopedic implants...not breast implants!

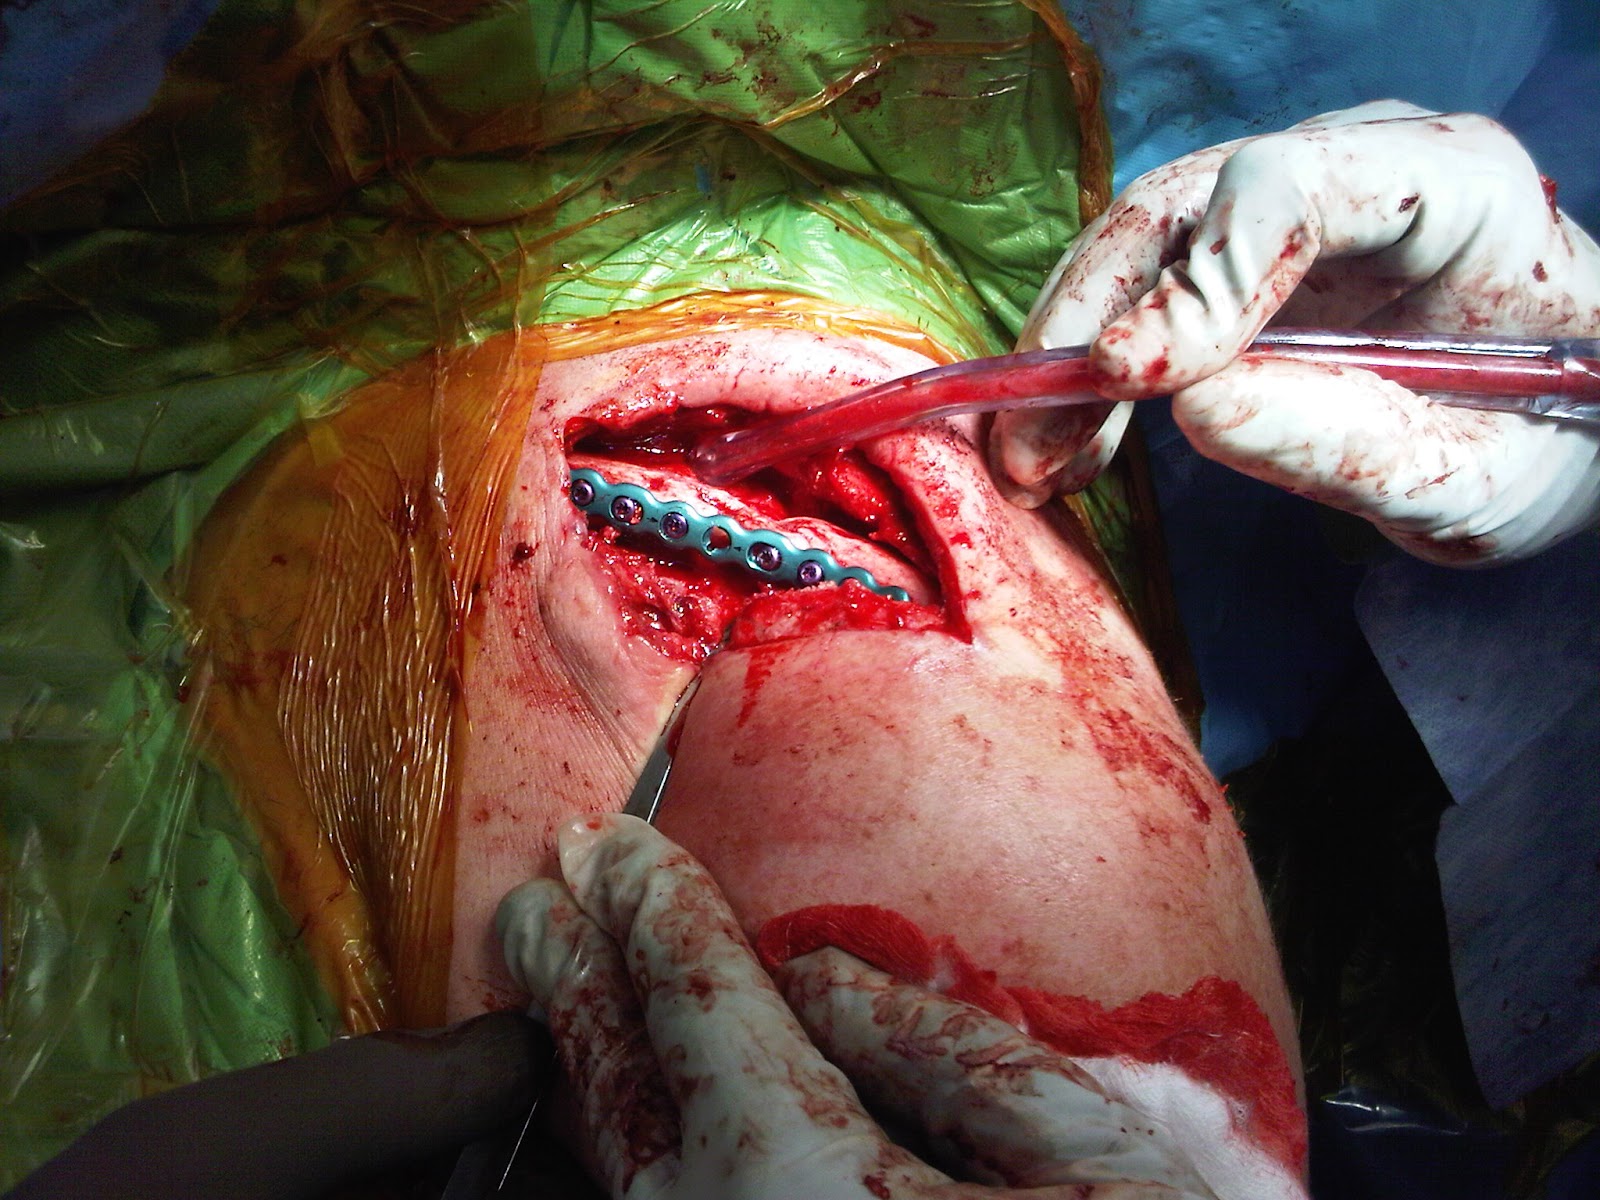
WARNING: The following post is not for the faint of hear; if you have a weak stomach, you might not want to read any further. I have included pictures from surgery in this post.

Alright folks, I want to help you dive into my world a little bit more. Today I'm going to talk about my job! Lets start here: 

That, my friends, is a picture of a real live human shoulder in the middle of a surgical procedure called "open reduction internal fixation" or ORIF. This patient broke his collarbone, and the break was bad enough to need surgery to put it all back into place (the x-ray below is also a great example of a break that will need internal fixation of some sort). That teal plate that is sitting on the bone, is what the surgeon uses to put the bone back into place and hold it there. I was involved in the design of that plate.  


I work for a medical device manufacturer and have been with the company since I graduated from  college.

On a regular basis, I get to work with surgeons to design new and innovative devices for bone fixation. I get to spend a lot of time working on 3D modeling programs to design the parts. I get to work with our manufacturers to figure out how we're going to make the parts (that's usually the tough part). I get to play around in on the machines in our prototype shop and watch my designs go from computer models to physical parts in real time.


Yup, I designed that plate too :)

I really enjoy my job, I have a wonderful boss, I can basically do something new every day, and I was lucky enough to have gotten the job offer the day I graduated. One month later, I moved to Akron and started down this bloody, cadaver-y path to designing medical devices. 


I was surprised that cadavers didn't really bother me. We actually have an ice box (which used to belong to our CFO) in the cadaver lab that we keep all the specimen in. That ice box used to sit right behind my desk, in our old office. We used to hold our cadaver labs basically ON our desks. That was when the company had about seventeen employees. Now, about 2 years later, we're upwards of fifty. 

Playing with dead bodies are a way of life in this industry. Of course, the bodies are all treated with the utmost respect! Although once upon a time, while I was working on the plates that are in the pictures above, we had a cadaver lab in  Houston and one of the surgeons on the design team sent me home with 4 human collarbones to use to make sure our new designs fit the bone correctly. Yep, they came home in our checked bags.

WHAT in the world am I supposed to do with human bones?!

Well, I need to make sure that all the "meat" is off of it, right? Otherwise how am I supposed to make sure my parts fit onto it? How do I do that? (What, you didn't know this was ALSO going to be a how-to post??)

How to clean cadaveric bone: 
  1. Buy a large pot (depending on the size of the bones in question) that you intent to toss as soon as this little science experiment is over
  2. Fill pot with water and add some bleach for good measure, since bleach kills everything
  3. Add cadaveric specimen to pot with water and bring to a boil
  4. Cook for about an hour, or until you feel like the "meat" has cooked off adequately
  5. OPEN ALL THE WINDOWS IN YOUR APARTMENT, LIGHT SOME SCENTED CANDLES AND INCENSE (can you tell this step is important?). Also try not to alarm other tenants with the cadaver-y smell
  6. When the cadavers are done cooking, let them cool and dry on a pile of paper towels that would rival the height of the Empire State Building
  7. Throw away your cooking water and the pot
  8. Make an attempt to rid your apartment of the cooked cadaver smell so you're not scarred for life with the sense-memory of your human bone stew.
Yeah, I actually did that in my apartment because there was no place to do it in my office. There have been a few other times when my colleagues have had to clean off cadaver bones the same way. I am still scarred by the smell. In fact, just the other day, a colleague of mine accidentally forgot about his cooking bones and let all of the water boil off. The smell pervaded our ENTIRE office building. Oops. 

It's all worth it when you finally see your work come to fruition though. The first time I watched one of my designs being implanted into a real live patient was an awesome day!


What do you do for a living? Or for fun? What is the strangest thing you've ever had to do for your job?

Peace, Love & Bagels, 

Wednesday, February 9, 2011

Wineday Wednesday: Gascon Malbec


2009 Gascón Malbec
Mendoza, Argentina
$13.99

This has been my favorite wine for some time now. I am completely enamored with a Malbec from just about any winery, but Don Miguel Gascon has taken the cake for me. It’s very bold and fruity with (as the back label has informed me) a hint of mocha. It’s a pretty dry and very robustly deep purple wine. Also, it’s definitely more in my general, everyday, wine price range than the Rombauer Chardonnay was, although I’ve seen it as high as $19.99 at Acme (or was it Giant Eagle?)


This grape is native to France, but they are more suited for the soil and winds in the Mendoza region of Argentina. From the Gascon website (gasconwine.com):

“As the Malbec adapted, winegrowers selected the best vines and took cuttings to propagate them, creating a genetic pool of Argentine-only Malbec that was thicker-skinned than its French forebears, small berries in tight, flavor-packed clusters, with tannins rounded out by 150-170 days of hang time.
Argentine Malbec most often grows on its own roots, since the absence of pests like Phylloxera reduces the need for site-specific root choices. Traditional winegrowers in Argentina believe that this yields a more pure and concentrated character in the wines.”

Long of the short: this wine is affordable and delicious. If you’re into reds, you’ll love this beautiful bottle!


DISCLAIMER/DISCLOSURE: I am, in no way, a wine connoisseur and have had no professional experience with wine tasting or reviewing. My opinions are my own and I am not compensated in any way for them.


Peace, Love & Bagels, 

Related Posts Plugin for WordPress, Blogger...