Showing posts with label diy. Show all posts

Tuesday, September 13, 2011

Making the Dress, part 1

One of the first thoughts I had when Brandon asked me to marry him, was "I want to make my dress." 

I swear I'm not delusional...I made my prom dress in high school. Also, I don't even have a wedding date yet, but I'm starting now, so if I F-up then I still have time to buy a dress. 

My first task was to pick a pattern. After much deliberation and sending pictures to just about everyone that I knew, I settled on this one:
{photocred: http://www.sewdirect.com}

Except, I really want capped sleeves, so I'm going to play with the pattern so they will look more like this:
(sorry, this is the best I could do with Paint)

That, and I'm going to add a sheer outer layer on the skirt, if you can imagine what that looks like. 

Step two, buy material. I settled on a nice flowy silk, with chiffon as the aforementioned outer layer. I'm also going to make my sleeves out of the chiffon. 


So then after I made sure to wash and pre-shrink any material (not as if this matters for me, we don't have a working dryer - although I did steam it) I laid it all out in my living room...er, I should say all over my living room:


Now is the fun part... 

...and by fun, I mean tedious. Pinning the pattern to the material. 


Ingrid (my step-momma) always told me, pin twice, cut once. 

The skirt is going to be the toughest part. It's got a lot of real estate. 

And so it goes, I have officially begun the making of my wedding dress. As of today, I've got about a third of the lining cut. My plan is to put a couple of hours in at a time, one or two days a week...that way I won't get overwhelmed and/or bored trying to do it all at once. 

Wish me luck!!

Wednesday, September 7, 2011

Quarter Century Firsts

Last week was an age 25 first for me: preserving!!

Brandon and I have been talking about canning/preserving for months now and I finally utilized my 20% off coupons from Bed, Bath & Beyond and bought a canning "rack". We had already purchased a huge stockpot for our homebrewing adventures.

So between the ginormous stockpot, a newly purchased canning rack and all of the deliciously home-grown tomatoes from our garden, it was the perfect chance to make a big batch of sauce and preserve it so we can enjoy it during the depths of winter.

If you are like me, and live in a place where the sun shines for 70 days out of the whole year and the winter lasts for 9 months, you are going to want to get on the preservation wagon so you can save all the freshness of summer to help get you through another winter.

do. it.

what you'll need...
  • big stockpot/saucepan, keep in mind you'll need something to completely cover the jars
  • jars (I like the pint jars, but quart jars work well too) and lids (the kind with a cap and band)
  • canning rack. Actually, you can use a cooling rack if it will fit into your pot - ours is square and the pot is circular, so that didn't work. 
  • something to preserve, the kind of canning I'm talking about is for high-acid foods like sauces and salsas. You need a pressure canner if you want to do vegetables, meats and seafood.

First, find a recipe or make one up yourself - salsa, marinara sauce, etc.... If you use a canning recipe (check out this site) you get the bonus of them telling you exactly how long to process your jars for. I made my sauce a day in advance in the slow cooker, quick and easy.

Second, once your sauce (I say sauce because that's what I did) is ready to go, fill the stockpot with water and bring it to a simmer. Clean your jars and lids thoroughly.

Third, fill the jars with your sauce. If the food is hot when it goes into the jars, it is recommended that you warm the jars and lids first - either by boiling them or using the dishwasher to heat them up. Make sure you leave some head space for expansion (quarter inch for soft spreads such as jams and jellies and fruit juices; 1/2 inch for fruits, pickles, salsa, sauces, and tomatoes). Once the food is in there, remove any air bubbles by sliding a rubber spatula down and around the sides of the jars. 

Fourth, clean the rim of the jar so there is no food left on it when you put on the lid. Put the lids on the jars and close til they are "finger tight".

Fifth, place jars in the canning rack and put them into the stockpot of simmering water. Make sure you have an inch or two above the top of the jars.

Sixth, process the jars for their allotted amount of time. If you didn't use a recipe specific for preserving, estimate your time by using a processing time that is use for a similar type of food (again, you can find those recipes here). Tomato sauces are in the 35-40 minute range.

Seventh, after processing, remove from heat and allow jars to sit in water for another 5 minutes.

Eighth, carefully (use a hot mitt!!) remove jars from the canning rack and set somewhere where they can cool and sit for 12-24 hours, undisturbed.

Ninth, check the lids for a seal. The lids should not flex up and down if they are sealed correctly. You can also check them by removing the band and trying to lift the lid off with your fingertips - it shouldn't move. If they didn't seal properly, you can reprocess them immediately or just use whatever you are trying to preserve!

Oh, and speaking of preserving our harvest from our garden. Look at what we harvested on Saturday:

Yup, that's a tiny ear of corn!!! It was about 1/18th the size of the Ohio Sweet Corn you find at the farmer's market, but it was just as delicious!


Tuesday, February 22, 2011

DIY Circular Scarves

This is a great step in the right direction towards accomplishing my goal to create rather than consume. My favorite way to exercise that goal is to make gifts for others (like my homemade infused olive oil for the holidays).

This endeavor, in particular, was a gift for Brandon's sister, Tanja. She turned 30 on Valentine's Day this year, and since it's difficult to get reservations anywhere on V-day, we had her over for a birthday dinner at our place. Many cupcakes, cookies and chocolate covered strawberries were consumed that night and it was glorious!

Circular scarves seem to be all the rage right now:


Well, at least I bought one last year from my yoga studio and now I'm kicking myself because they take about five whole minutes to make. Oh, and not only is this working towards my "creating" goal, it also is helping me to de-clutter! These scarves is made out of t-shirts!

Lord knows I have enough of those to clothe a small army. 

All you need is a few t-shirts (preferably complementary colors...but feel free to choose whatever moves you). I used two t-shirts per scarf. Here is the process: 

  1. Cut shirts into strips, starting from the bottom of the shirt. It's easiest if you cut off the hem first, because it's sort of too thick to use...but feel free to make it into a doggie toy, that's what I'd do!
  2. Take all of your strips and stretch them out until they've doubled in diameter. To do this, I looped them around my feet and yanked with my hands (I didn't have any extra limbs to use to take pictures for this part of the process).
  3. Tie all the stretched strips of t-shirt together with (yet another) stretched strip. Loop it around a few times, so you've got some beef to hold the rest together. 
  4. Admire your handiwork. 

(cut like so)


What was your favorite homemade gift (given or received?)

Peace, Love & Bagels, 

Thursday, January 27, 2011

Easy Peasy Homemade Legwarmers

You are going to think I'm nuts for actually posting this, but I am so thoroughly excited for my newest discovery that I just had to!


It's been an ongoing argument in my office whenever I have my space heater on, my boss comes over to yell at me (ok, I'm embellishing a bit) that the space heaters are tripping the thermostat and his office is FREEZING. Our side of the office is still freezing, thank you, and I'm going to keep my space heater on if you want me to be a productive part of this company. His rebuttle? WEAR SOCKS IF YOU WANT TO BE WARMER.

Excuse me, but the majority of office-appropriate woman's shoes that I own do not jive with socks. I'm happy to wear socks and 'sneaks everyday, but that is (regrettably) against our dress code, per the employee handbook.

I've been thinking a lot about simplifying my life, consuming less, creating more. Buying a pair of shoes that is sock-friendly is the last thing I want to do right now.

So what's a freeze baby to do?!?! (Mind you, we just got back from 75+ degrees in Maui!)

Make my old socks into legwarmers, duh!

Brandon will tell you that he told me to do this months ago, but I beg to differ (ahem).

Easy Homemade Legwarmers
makes 1 pair
Time: 3 minutes (more if you have to search for your scissors)
Cost: $0 if your socks have seen better days

Ingredients:

  • 1 pair of old soccer or softball socks (actually any socks that are taller than ankle socks will work, just depends on how much of your leg needs to be kept warm)
  • 1 pair of scissors

 Directions:

  1. Cut the feet off of your socks, right at the ankle. If the toes aren't holey, you can now use these as feet warmers, or regular old socks.
  2. Pull the long end of the sock over your foot and wear on your leg (as shown in the picture above)
  3. Brag to the world, via your blog, about your brilliant leg warmer idea! Also, tell your boss he can take is 65 degree office and shove it...hmm, on second thought, don't do that.
Do you have any brilliant do-it-yourself ideas that have saved you some money? I'd love to hear them!

Peace, Love & Bagels,

Thursday, November 18, 2010

Almond Milk and Almond Hummus Recipe


I'm a huge proponent of anything homemade. I mean, (to steal a quote from Brandon) the Giant Eagle's and Whole Foods of the world didn't exist more than a generation or two ago...people have been thriving on all things homemade for centuries! If they were suddenly gone...what would we do?! I'd make homemade almond milk and homemade hummus, that's what I would do! 

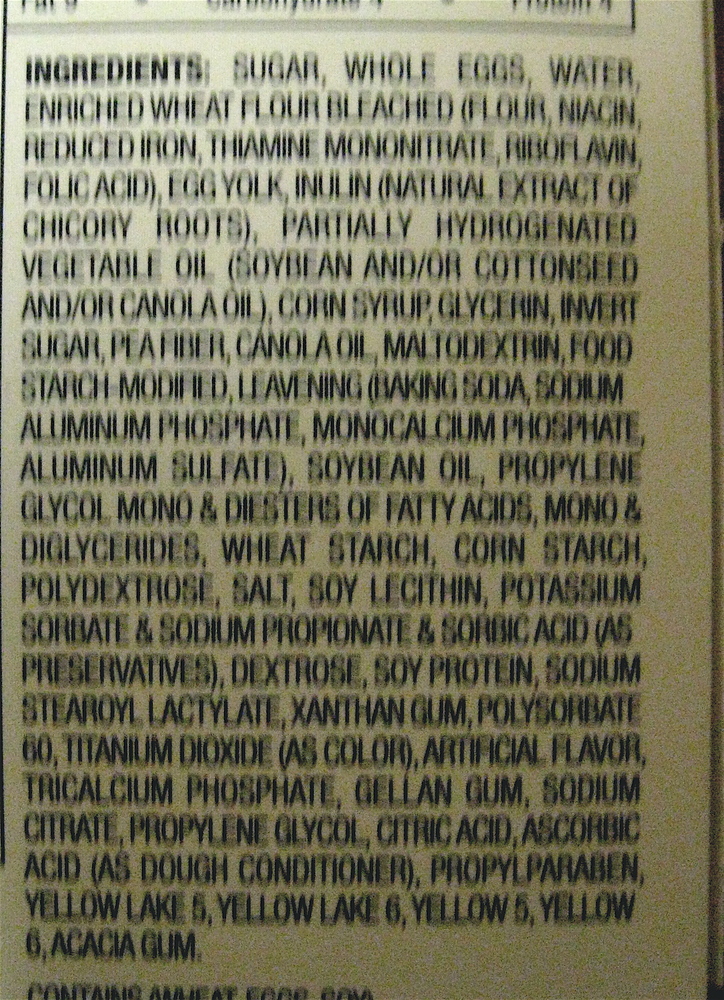
In all seriousness though, I love making things myself because I can control what goes into them. I won't be putting any chemicals, preservatives or other ingredients unpronounceable names into my food! 

Ingredients in a Twinkie (source)
Homemade almond milk and almond hummus are two things that Brandon and I discovered when we did our change-of-seasons, week-long raw foods cleanse (something I want to do again when we transition into the spring again...maybe for two weeks this time???).  I can't begin to explain what an incredible learning experience that week was for us.It was a different way to get to know your bodies, that's for sure. With a little planning, it's definitely a diet that I could sustain for longer than a week. Part of the goal of eating only raw foods was to explore new ways to prepare and eat the foods that we already eat regularly, which is why I still make almond milk just about every week...and almond hummus (using the leftover almond meal from the almond milk) is our new favorite type of hummus. Best of all, you can adjust the texture, flavor and spicyness from here til Sunday. 

Homemade almond milk and almond hummus = love.


How to make almond milk:
  1. Soak about 1 cup of almonds 4-8 hours or overnight. I usually do just over one cup.
  2. Drain and rinse your almonds then place them in a blender, food processor, magic bullet...anything you use to grind/puree/whip/liquefy.
  3. Cover almonds with water and blend them until they turn into liquid-y ground almonds, then add more water and blend for another minute or so. (The flavor of your almond milk depends on your ratio of almonds to water, I normally do just over 1 cup of almonds to three and a half or four cups of water - it's all up to you!)
  4. Strain your milk using a sprout bag, cheesecloth or fine mesh strainer into a bowl, or anything that will hold the amount of liquid that you are straining. 
  5. Voila! Almond milk! It keeps for 3-5 days in the fridge...I've actually experienced some separation between the water and the nut oil after it sitting in the fridge for a while, just give it a shake and you'll remedy that!
...now, what do you do with all that leftover almond meal??? You make almond hummus!!

Raw Almond Hummus Recipe
adapted from The Raw Food Coach

Ingredients:
~1cup almond meal (leftover from almond milk!)
1/2 cup tahini
1 large garlic clove (I generally use several-love me some garlic)
juice of 2 large lemons
sea salt, pepper, parsley and basil to taste

Directions:
  1. Add all ingredients into a blender or food processor, blendy until you've achieved a smooth (hummus-y) consistency. You will probably have to add some water to get everything moving.
  2. Taste test: you might want to add more salt, pepper, herbs, etc. Here's where you can go nuts! I've been known to add a jalapeno or crushed red pepper flakes for some spice. I've also included roasted red peppers once or twice. Maybe some pinenuts??? Get creative!!


What are your favorite homemade things? Is there something you've been dying to try to recreate at home? I'd love more homemade ideas! Please leave me a comment or email me, peaclovebagels [at] gmail [dot] com.

Related Posts Plugin for WordPress, Blogger...